
Ordered two Pitman arms (part #33321126476) from rmeuropean.com at 13:30 local time yesterday. At 11:30 local time today the package was at the door.
That's the shortest shipment time ever. Wow.
Thursday, May 21, 2009
Oh Noes! The Clutch Is Gone... And Back
...now have to figure out what's the cause, and how it is related to yesterday's brake bleeding session.
Master cylinder is the main suspect until the morning sun comes.
UPDATE: Just air in the system, nothing more. Bled the hell out of it while identifying the issue - it's not immediately obvious where the intake hose is, and it's easy to suck the air into the clutch system unless you're watching the fluid level in the main reservoir. For the reference, a safe volume from the maximum level to the level you have to stop at is about 8 fl oz, or 200ml.
Before you set out to bleed the clutch, you may want to check if you need to replace the bleeder screw (part #21521116360), and whether the dust cap (part #21521102908) is in place - will save you some grief.
It is possible to use a vacuum bleeder to bleed the clutch, even though this is not a recommended way - you will most probably have to unscrew the bleeder screw completely (there will not be a massive leak), wrap it into teflon tape and screw it back (thanks to mooseheadm5 for the advice) - otherwise you'll be sucking air through the bleeder screw thread.
While you're there, you might just as well take off the slave cylinder and push the air out of it. Don't have the pedal all the way up when you're installing the slave cylinder back, you won't be able to overcome the resistance of the clutch release spring and put the nuts back.
Tuesday, May 19, 2009
Wonderful Discoveries of Brake Bleeding
When you bleed the brakes for the first time on the car you've just bought, don't be surprised if the brake pad wear sensor cable is neatly tucked under the bleeder valve cap tie. All of it. Including the sensor. Apparently, no participation in the actual process of measuring the brake pad wear was deemed necessary by the last person that changed the brake pads on the car.
Makes me desperately want to check the brake pads and rotors' thickness, despite seller's passionate assurances that they've been *just* replaced.
Makes me desperately want to check the brake pads and rotors' thickness, despite seller's passionate assurances that they've been *just* replaced.
Tuesday, April 28, 2009
All You Have To Do Is Ask Nicely
Shopping for the next batch of parts for the Bucket List, found a bizarre fact - one seller (names withheld to protect the guilty) had outrageously high shipping price for quite an ordinary bulk item, even though the unit price for the item was about as half as it was in other places. Given that shipping price, it didn't make any sense whatsoever to buy from them, even though every single item in the batch also was priced below the competition.
Well, I thought, it doesn't get any worse, I thought, and called them. Explained the situation, and guess what? They corrected the shipping price, turned out to be a misunderstanding.
All in all, I am probably going to order from a different retailer (those guys do have very high shipping prices on all items and that totally offset savings on unit price), but the rule of the thumb still stays true:
Sometimes, all you have to do is ask nicely.
Saturday, April 25, 2009
Fun Facts: Chemical Compatibility
Standard issue surgical gloves are transparent for mineral spirits. If a job you're doing is your first time, or you're just tired and forgetful or simply careless and are not listening to what your skin is telling you, you may end up with chemical burns. Not fun.
By the way, WD-40 is 50% mineral spirits as well.
By the way, WD-40 is 50% mineral spirits as well.
Friday, April 24, 2009
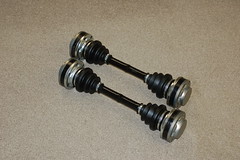
Drive Axles Are Back
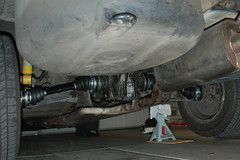
One hiccup down the road - almost got a heart attack when I saw the pit. Then I realized that it's been there since June 1987, exhaled and kept going. The rest was uneventful, except for a little chemical surprise.
PARTS
4 repair kits (part #33219067906), $60.
MATERIALS
Odorless mineral spirits.
RESULT
NOTES
Before you start disassembly, you might want to carefully examine mounting bolt (part #07119919620) heads for damage - and that's really difficult to do while they are still on the car, for they are probably buried under a healthy layer of baked oil and dirt. Might save yourself some aggravation and order them upfront - the cost, even for the complete set ($25-$50 plus delivery), is marginally comparable to the effort to repeat the procedure, or to the aggravation of having a bolt head stripped while trying to torque it in.
Oh, and it goes without saying that you'd want to see if you also need to replace the diff gaskets while the drive axles are off, but that significantly extends the maintenance window - so we had to skip on it this time.
Thursday, April 23, 2009
The Bucket List
UPDATE
All the stuff below is irrelevant, superseded by the fact that the car's been totaled and is being parted. Nevertheless, it's been left in to give some more information about the state of the car (most of it survived).
DONE
- Replace hood mechanism
- Replace broken turn signals lens (part #63131386611)
- Flush coolant system, 2009/04/16 @203,500mi
- Replace diff fluid with known good (Mobil 1 LS 75W-90), 2009/04/16 @203,500mi
- Replace engine oil with known good (Mobil 1 10W-40 High Mileage), 2009/04/23 @203,787mi
- Replace accelerator cable, 2009/04/24
- Remove ugly "got bmw?" sticker
- Replace CV joint boots (torn), repair kit bellows (part #33219067906), 2009/04/24
- Replace tires (bought the car with three 200/60R15 and one 195/65R15, with surprisingly little effect on stability - the car must've been very well engineered in order to withstand such abuse) - Yokohama AVS ES100, 2009/05/01 @204,205mi
- Flush brake system - 2009/05/19 @204,875
- Flush clutch - 2009/05/23
- Apply a temporary fix for a broken exhaust pipe hanger - 2009/05/31
- Permanently fix broken off exhaust pipe hangers (welded back) - 2009/06/05
- Replace Pitman arms (part #33321126476) - 2009/06/20 @205,911
- Replace diff mount (original part #33171125290, replacement part #33171129786) - 2009/09/29 @210,960
- Replace engine oil with known good (Mobil 1 10W-40 High Mileage), 2009/10/11 @211,684mi
- Replace right low beam insert (part #63121373061), 2009/10/22
IN PROGRESS
- Nothing
- Replace cruise control cable
- Replace all differential gaskets (leaking), gasket set (part #33101210518)
- Replace front brake pad wear sensor (part #34351179819)
- Check rear brake pad and rotor thickness
- Verify that brake calipers are not sticking, lubricate and replace if necessary
- Identify the cause of power steering fluid leakage and fix it
- Identify the cause of transmission leakage and fix it
- Replace transmission fluid with known good
- Fix the driver door lock (see if the part #51219061341 is what's needed to fix it)
- Replace worn out front suspension parts
- Check rear suspension and see what needs to be done
- Replace spark plugs
- Clean the distributor
- Check ignition wiring, replace if necessary
- Replace Service Interval Board
- Bring Check Control back to life
- Pass emissions test (unlikely)
- Replace exhaust system (part #18121178263)
- Replace exhaust pipe catalyst (part #11769059153)
- Verify that the oil pan gasket (part #11131315085) is not leaking
- Verify that the oil level sensor is not leaking
- Keep an eye on right rear view mirror - may be falling out
- Keep an eye on ABS sensors (part #34521154044, 34521155709 and 34521155710) - cable insulation is aging and falling apart
- Replace broken oil filter housing (part #11421266372)
- Replace stupid fake carbon fiber black-and-white roundels with proper blue-and-white ones
- Replace driver window "up" button (works intermittently) (part #61311381205)
- Replace sunroof deflector mechanism
- Replace broken fog light (preferably both, for the other one is also worn) (part #63121468224)
- Implement the wimpy brake light fix
- Fix all dents, repaint
- Replace all mouldings that need replacement
- Replace all seals that need replacement
- Replace broken interior panels
- Replace headliner
- Look under sheepskins, fight gag reflex, replace upholstery
- Replace dashboard (part #51451872376)
- Replace aftermarket audio system speakers with disgusting sound with something decent - or rip the aftermarket audio system out completely - who needs to listen to anything while driving E28?
- Rip out stupid (allegedly Ferrari) horn that sits in the middle of the engine compartment and interferes with engine access; verify that OEM horn is operational and connect it instead
- Find a suitable cover for the place where no longer necessary front bumper registration plate (part #51181855952) was
- Replace squealing AC Blower (part #64111354618 or 64111386369)
- Replace trunk lid torsion springs (part #51241919481 and #51241919482), it appears that the spoiler is not an original part and the trunk lid doesn't pop up by itself - or, the springs are just too old
Subscribe to:
Posts (Atom)